
Using Graduated ND filters for Landscape Photography
We all go through phases of learning and
every once in a while figure out something that forever improves our photos.
This happened to me the day I started using Graduated Neutral Density
(GND) filters to control contrast in my landscape photos. I've since fallen in love with them, and my photos have
improved dramatically. I now consider these filters to be completely essential for
landscape photography.
The need for contrast control techniques in landscape photograph is because the difference
in brightness between the land and sky is often too great for a digital sensor
or film to handle. Most people end up either exposing for the sky OR the
land, at the sacrifice of the other. For example, in a composition where 2/3 is
land and 1/3 is sky, if you exposed for the darker land, then the lighter sky
would be significantly over-exposed, or vice-versa. To solve the problem,
there are two main methods: 1) use a GND or 2) take multiple exposures of the
same scene and combine the photos using imaging software. I much prefer to use a
GND filter to get the exposure right in the field... rather than spend more time
at my computer!
A GND filter is quite simple - it's just a piece of plastic or glass with a
darker (neutral color) part that fades to clear. The best GND filters are
rectangular and can either be used with a slotted holder or handheld in front of
the lens, allowing you to move the filter up or down in front of the lens. This allows you to position the darker portion precisely over the
lighter sky, thereby making it closer in brightness to the land (in technical terms,
we would describe the brightness in stops of light). This balancing of exposure
results in a smaller range of overall brightness in the photo, which your sensor
or film
can record accurately. The result is that you can have a dramatic landscape
photo with detail throughout the sky, land and foreground. Most of the best
landscape photos you've ever seen have been made with GND filters. I should note
that when used properly, it's hard to tell that a filter has been used at all. This is a subtle filter that makes your photo look more like what
you actually saw in person.
There are a number of companies that produce GND filters including Singh-Ray,
Cokin, Lee and Tiffen. For a long time I used the affordable Cokin filters, but
I switched to Singh-Ray filters many years ago - and they are now my top choice.
Though the Singh-Ray filters are fairly expensive
(about $100US for a GND filter), they are high-quality and truly neutral in
color (the Cokin filters produce noticeable color shifts and the optical quality
is inferior for high-end results). Singh-Ray is also a company that listens to
the needs of nature photographers, and they continually introduce new filters to
suit our needs.
You will have a few choices to make when you purchase your GND filter - whether you want a 2 or 3 stop filter, and a soft-edge (fades) or hard- edge (abrupt) gradation. My suggestion is to get started with two basics: 1) a 2 stop, soft edge grad ND, and 2) a 3-stop, hard-edged grad ND. These will cover most landscape situations, although over time you'll probably want to add a few more grad versions to cover a wider range of situations.
When shooting with grads, I either use a Cokin P-series filter holder (see photo below) to position the filter or I handhold it in front of the lens. Recently I started using the larger-sized 4"x6" Singh-Ray grads (they are easier to position and have less vignetting with wide-angle lenses) so I prefer to handhold them. If you go for the filter holder, try to find the wide-angle (slim) version or cut the outer slots off the standard P-series holder to prevent vignetting with a wide-angle lens. The great thing about this system is that you buy adapter rings to fit your various lenses, which means that your filter holder and filters can be used on multiple lenses - a cost-effective and practical solution!
If you're even casually interested in landscape photography, Graduated Neutral Density filters will improve your photos. Pick one up and experiment with it - I think you'll find it to be as helpful as I do. For more information about use of GND filters, all you need to know can be found on the Singh-Ray website (www.singh-ray.com).
Best of luck shooting!
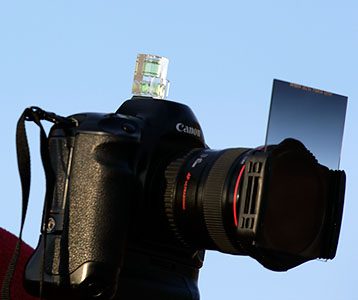
Here I'm using a Singh- Ray
3-stop soft-edge graduated ND filter in a P-series filter holder.
Note the level in the camera's hotshoe - I use it to keep the horizon level.
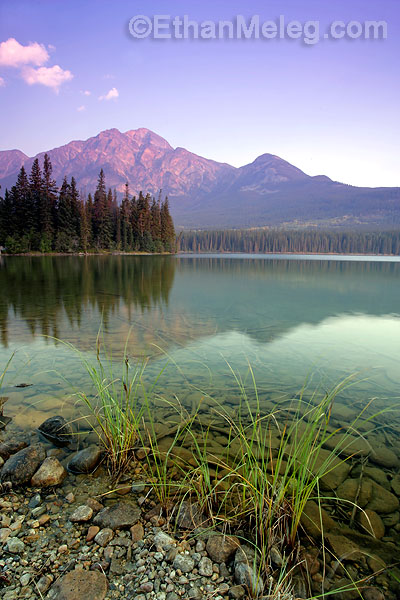
Featured photo at top:
Pyramid Lake in Jasper National Park, Alberta - September 2006.
Canon EOS 1DSm2 with EF 17-40mm lens at 21mm
ISO 100; Aperture Priority; Exposure: 2sec at f22
Singh Ray Warming Circular Polarizer LB (wide-angle version), Singh-Ray 2 stop soft edge GND
(4x6" size, handheld in front of lens).
Mirror lock up and cable release.
This
site © Ethan Meleg, all rights reserved. No form of reproduction,
including copying or saving of digital image files,
or the alteration or manipulation of said image files is
permitted. Any unauthorized use of these images will be
prosecuted
to the full extent of federal copyright laws. Site design and
maintenance by Ethan Meleg.